Learning Lessons with Mrs. Labrasciano Home Shop Instagram Pinterest Email Image Map

Halloween - ELA Lesson Plans #10

Click here to learn all about teaching ELA in the 2nd grade classroom.  These free and fun lesson outlines will detail curriculum and ideas for all informational, literature and writing standards in my elementary classroom.  Your second grade students will love the lessons and activities shared here.  These lesson outlines are added and updated almost each week.

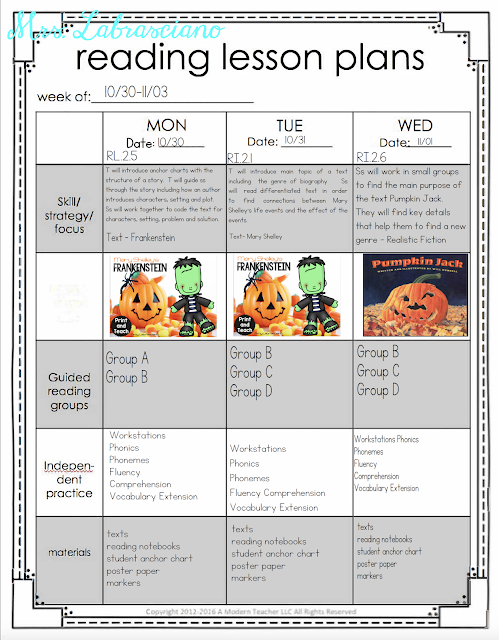
Every teacher knows that this week has the kids acting a little bonkers.  You'll notice that while my lessons all have a Halloween theme, they would work for classrooms that don't address Halloween with the exception of Big Pumpkin and Happy Haunting.  You could just switch out the titles if you prefer.  I'm super excited that I spent the beginning of the year building up student's reading foundations because we are starting Monday with the entire plot of the story.  Students will get into coding the text with the different parts and even have conversations about the author's point including the lesson/central message.  The fact that they can do this efficiently in a 20-30 period of time is awesome! Tuesday's lessons is all about Mary Shelley who had a rough childhood which she overcame to become an infamous author.  Students will connect events in her life to choices and other events.  In case you don't know, I'm a HUGE Pumpkin Jack fan.  It is a realistic fiction book that follows a boy and his pumpkin through the pumpkin's entire life cycle.  We will put a pumpkin outside the following day and watch it decompose and sprout a pumpkin patch.  If you want to see detailed lessons on Pumpkin Jack visit here.  Thursday and Friday focus on fun, engaging simple text.  Students are not going to be at their finest and I would rather see them accomplish something rather than nothing.

Click here to learn all about teaching ELA in the 2nd grade classroom.  These free and fun lesson outlines will detail curriculum and ideas for all informational, literature and writing standards in my elementary classroom.  Your second grade students will love the lessons and activities shared here.  These lesson outlines are added and updated almost each week.

Just like reading, I feel like we've turned a big corner in writing.  We are taking our first standardizes writing assessment and really editing it.  We'll only be focusing on contrasting to start. Once they have mastered certain crafts and structure we will add to the standard with comparing too.

Click here to learn all about teaching ELA in the 2nd grade classroom.  These free and fun lesson outlines will detail curriculum and ideas for all informational, literature and writing standards in my elementary classroom.  Your second grade students will love the lessons and activities shared here.  These lesson outlines are added and updated almost each week.

If you are interested in the Frankenstein and Mary Shelley text that I'm using, you can click below to see it in my store.


My lesson plan templates come from A Modern Teacher.  If you want to find the first in my lesson outlines click here.

DIY Classroom Mailbox


Need a mailbox for your students to turn in sweet letters, suggestions or private concerns? I recycled this mailbox which my daughter had for Valentines.  I wish I would have taken a before picture, but it was in a blue and purple Frozen theme.  I used a cheap $1 can of spray paint to paint it black.  The flag was red and I painted it with acrylic paint.  The letters were cut on a Cricut and voila, now students have a place to turn in their thoughts and I stay organized (hopefully).

Social Studies: Native American Projects in the Classroom


If you're like me, teaching social studies is near and dear to your heart.  In this post you will find a few ideas about creating meaningful projects in the classroom to help your students understand some Native American history.  When creating the projects I've kept in mind time, money and skill level.  


Native Americans created pictures on rocks to record their tribal history.  These pictures could be done by drawing, painting or carving into the rock.  The southwestern United States contains the largest concentration of rocks used by Native Americans to record their tribal history.  You might see pictures like buffalo, horses, deer or hunting on these rocks.  


When teaching students about this tradition you could do a couple of projects that are quick and meaningful.  Consider giving your students rocks with a flat surface and asking them to record part of their history on the rock.  That may contain a car for transportation, food or something important to their everyday life.  You could also have them research cave drawing and recreate a picture on the rock and explain it in writing.  The rocks above were drawn on with sharpie marker and it took about 2 minutes.


Animal hides have been used by Native Americans for several purposeful reasons.  They were used for practical reasons like clothing, travel and shelter.   Hides were also used for spiritual reasons like healing the sick and promoting healthy moms.  Some tribes recorded their history on the hides with paintings.

When teaching students about this tradition you could give them brown paper bags, construction paper or dye paper a brown hue.  Have students research the history behind hides and recreate something using the paper as a hide.  The paper above was stained with water and a bit of brown paint in the water. It took 2 minutes to paint it.  You could allow it to dry over night. It took 5 minutes to create the drawings.


The popular dreamcatcher was originally created by the Ojibwe.  It was created to catch everything bad or evil and protect infants.  The dreamcatcher was hung on the infant's cradle or carrier.  Spiritual or sacred items could be used when weaving the web in the dreamcatcher.  Such items might be feathers, beads, bones and hide.

Consider having students research dream catchers and creating one of their own with paper plates, string and other items that you have in the classroom.  The design intricacy could be chosen based on the age of your students.  I numbered the holes for students which allowed them to string it in about 10 minutes.  Click here to find a pattern for the holes and numbers.


Native American jewelry has long been admired for it's beauty and meaning.  This jewelry can be include necklaces, earrings, bracelets, rings, pins, belts, etc.  While jewelry is different and specific to each region and tribe, many times designs are borrowed and used across areas.

Some materials used to create necklaces were bone and stone.  Have your students research the significance behind this jewelry and create a necklace of their own.  Consider having your students paint pasta like bones/stones and creating a necklace of their own.  We dropped a little bit of paint in a paper Dixie cup and had students swish the pasta around.  After the paint we laid the pasta out to dry.


If you are in need of reading passages, lessons and materials to teach your students about the different Native American Regions check out the unit below by clicking on the picture.


Find another detailed post about teaching Native American History here:
Click here to learn about teaching elementary students about Native American History.  You'll learn how to combine your Native American social studies unit together with reading and writing in order to fit everything into your year. Common core standards are included in the post to help you align your curriculum.  Perfect for 2nd grade and 3rd grade writing curriculum!


Author's Purpose - ELA Lesson Plans #9


 Boy is this week going to be fun!!! We are going to take some very difficult standards or level 3 cognitive difficulty standards to be exact  and turn them into a week of hands on engagement.  This week will also kick off a week and a half of monsters, bats and spiders!!!!  Our ultimate goal is to have students understand strategies that will help them to identify the main purpose of a text, including what the author wants to explain.  In order to do this, we will start the week off with a quick fact and opinion lesson.  The students will work as a whole class to sort fact and opinion about a lovable green monster named Harry.  Once they have the hang of it they will work in small groups to synthesize the information and write their own facts and opinions about another lovable monster named Sally (Harry and Sally! lol) The class will come together to wrap up the lesson with a little information about how author's use information and their opinions to write pieces.  The next day will be a tiny detour from monster fun to read a piece on dental health.  While it doesn't stick with the theme, it does a great job of guiding students through the whole standard with a purposeful text and aligned questions.  Don't worry, you'll read below that students will spend time in writing doing awesome monster activities!  We'll finish off the week with bats and spiders.  The students will have to independently show that they understand the standard by writing and opinion piece and explaining it's purpose.

Just for reference, if you don't know I use the letter t for teacher and ss for students in my outlines.  Also, you can get the lesson plan templates that I use from A Modern Teacher.


We are going to read the mentor text How To Catch A Monster on youtube this week.  The students will be working on the writing crafts of vivid verbs and adjectives while writing a narrative.  We'll kick the week off by having the students write a very detailed description of their monster with adjectives.  Each student will then get a neighbor's description where they will have to draw the monster to an exact specification.  The author will use the drawing to make revisions to their piece the next day and the drawing will happen a second time.  Once all of the students have their monster descriptions written, they will write a narrative on how to catch the monster using vivid verbs.  The students will have to have their pieces written and edited by Thursday.  Everyone will take part in an author's share where they will present their piece to their friends.  The best part is that they will have a drawing and a writing piece to hang up for all to see!

 Students who get finished early will be allowed to make a 2 minute bat or spider craft to put on their opinion writing.  Click below to see how easy it is.


If you would go to the first of the lesson outline series click here.
To find this week's resources click below.


2 Minute Frankenstein Craft


Need a quick Frankenstein craft? I designed the one above for my students to write character traits on the back after we read about Frank and Mary Shelley.  

All you need to do is simply cut out a green circle and purple/black circle per student.  The students design the hair and put their Frankenstein face together.  I found felt eyes at Target, but you could have students draw them on.  They're a perfect way to allow students to build fine motor skills without taking up a lot of class time.  You can have students glue the faces to a writing sheet or write on the back of the circle.  Have fun!  

Did you know that the author Mary Shelley had to overcome quite a bit to become one of the world's most infamous authors.  If you need a kid friendly biography or fiction story about Frankenstein click below.


DIY Dry Erase Clipboard For Guided Reading and Reading Centers


I was walking down the office supply aisle at Walmart minding my own business when I came across a stack of brightly colored clipboards for $2.48.  Upon inspecting them I noticed that they were a high gloss perfect for dry erase markers.  As a bonus they have a cord that holds supplies.  They would work perfect on their own, but I immediately thought of activities at the guided reading table.  The students need 4 square organizers for vocabulary weekly.  They also enjoy playing Connect 4 Words and writing in sound boxes.  I cut out the organizers on my Cricut and placed one on each side.  I used permanent vinyl so that it could be cleaned and stay in place.   Voila, I have a $2.48 tool that will last forever at the guided reading table or reading centers.

In case you were dying to know a 4 square vocabulary organizer helps students to work through figuring out what unknown words are.  They write the word in the middle.  They sketch out the word in one  box.  They write what they think the definition is in one box.  A synonym goes in a third box.  The last box is used for the word in a sentence.

Connect 4 words is played like a cross between tic-tac-toe and Connect Four.  You write the words you want students to work on in the boxes with dry erase marker.  They choose a word.  If they read it properly they get to mark the square.  If they don't they skip a turn.  The first player to connect 4 words in any direction, wins.

Sounds boxes are Elkonin boxes.  You write one letter in each box.  The students make each sound until they've sounded out the box.  It's a great tool for emerging readers.

These dry erase boards store perfectly on their own, but if you need to store more supplies with them scan below to see what I'm doing.


Literature Circles - ELA Lesson Plans #8


Before we get into this week's lessons I want to answer a couple of questions from readers.  How long are my shared reading lessons?  Well it all depends, on average they are 20-30 minutes.  Some years they're longer, this year they are are usually around 20 minutes.   When you have a class that spans a huge gap in reading levels, reading time is best spent in guided reading.  Another question was; Do I differentiate? YES! Every one of the lessons in my classroom is  differentiated and we differentiate everything from reading materials, support tools to workstations, etc.  Some weeks you will see a very low lexile level in a text that I've differentiated for students while we kept the response for higher kids pretty challenging.  Feel free to email me with more questions that you may have or leave them in the comments below.  You can find the lesson plan pages at A Modern Teacher.

Learning is being kicked into overdrive this week.  So far we have covered all of the basic standards in depth and from the foundation up.  Students should be able to hold reading conversations that would blow your mind.  They can ask and answer questions.  They can find key details, do character analysis, etc.  Now it's time to give them ownership of their learning with your guidance.  We are moving into Literacy Circles.  We are going to start with text that we read together in class and end the week with self selected texts.  Students will begin by completing posters that retell the story with the lesson and character traits.  Once they understand what to do, they will select what goes on their posters at the end of the week.  I will edit this post later on to add anchor charts, but our guidelines are as follows.

Literature Circle Jobs
-Reader
-Writer
-Illustrator
-Questioner
(jobs will change daily to help students)

Literature Circle Options
-predict
-infer
-discuss character traits
-ask and answer questions
-discuss character reactions
-retell the story
-discuss the story's lesson

Literature Circle Rules
-Everyone participates
-Everyone listens respectfully
-Everyone leads parts of the discussion


This week there will be no writing lessons.  We will be conferencing and editing our last writing assessment.

Letter Bead Word Building


Need an inexpensive way to make a word work station that builds fine motor skills? If so this is the post for you!

You'll need:
Letter beads
Bead Organizer
Letter Stickers
Pipe Cleaners

I bought all of these materials from the Dollar Store and cut the letters for the top of the organizers on my Cricut.  You could also save $1 by writing the letters with sharpies.

To put the center together simply sort the beads, place stickers in each section and provide pipe cleaners. You could even have students sort the beads for you during their work station or center time.  You'll find some close up pictures below.

Central Message - ELA Lesson Plans #7


One of the mini lessons that I try to weave through my day is on falling in love with reading and introduction to new series.  If you have ever read the book "Miss Malarkey Leaves No Reader Behind" you'll be able develop a picture of me in your head of how I do this.  This week we will be exploring the series "Little Critters".  More specifically we'll be looking at their fall series which I purchased from the restaurant Cracker Barrel.  I'm sure you can find them on Amazon.  You know I'm a sucker for thematic weeks.  This week will have a subtle fall feeling from the critters series to our football workstations.

This week's post will look a bit different because I have my formal evaluation and just like every year, I'll leave you with my long lessons and free differentiated materials.  Each week you only get to see my lesson outlines.  I hope that you can use these long lessons and differentiated materials to see how you can reach all of the learners in your classroom.

The lesson plan template I use is from A Modern Teacher.


Click below for free resources to accompany this week's lesson outlines.


You can find a blog post on how to plan for formal evaluations/observations and more free resources by clicking on the photo below.


Character's Response - ELA Lesson Plans #6


This week's lessons focused on how character's respond to events.  The texts that we used were wonderful for this standard.  I will forewarn you that they are each very deep and you should pre read the text and decide what is best for your class.

In the text "Amazing Grace", the main character endears the reader from the start with her love for reading, story telling and imagination.  During the climax of the text Grace's classmates tell her that she can't play Peter Pan in her class play because she is a girl and person of color.  Grace's grandma steals the show with her reaction to the events teaching students that they can be anything they want to be.

In the text "Something Beautiful" the character is dismayed at certain parts of her neighborhood.  The focus being her courtyard which is riddled with trash and has graffiti on the front door.  The girl goes through the book collecting information on what makes life beautiful and ultimately decides to be proactive and make her neighborhood beautiful one action at a time.

The text "Fly Away Home" features a homeless father and son.  It shows their daily struggles and their reactions to the events in their every day life.  In the text the boy learns to be patient and wait for his turn to fly away home just like a bird that he encountered.  Make sure to have the tissues handy this week!


Are you interested in what my workstations look like? If so, take a look below.  Each week I differentiate reading stations for my students.  They have a great hands-on learning experience while their reading grows.  Click on the picture below to link to the units in my store.  


2 Minute Bat Craft

 Need a quick bat craft or Venn diagram for the classroom? I came up with this one to compare and contrast bat books.

1.  Cut 2 circles out per student.  I used my circle cutter.  It was a very wise $10 investment.  I can cut out a class set in under 5 minutes.
2.  Students cut one of the circles in half and glue on as wings.
3.  Have students add a face.

It's really that quick and simple!


Pumpkin Science Literature Connections


One of my favorite long lessons takes place during October with the book "Pumpkin Jack" by Will Hubbell.  In the book a boy has a jack o' lantern that he loves.  The pumpkin has to be placed outside where it decomposes and eventually goes through the lifecycle process again. During this same time we do pumpkin character book reports.  I always ask for a volunteer to leave their pumpkin so that we can see if what happened in the book "Pumpkin Jack" could really happen? Would a pumpkin decompose and start the lifecycle over again? If this happens, does it mean the book "Pumpkin Jack" is realistic fiction?  For years now, the pumpkin has always started a small pumpkin patch for us.

In the top photograph the pumpkin had just one seed left in it.  It started a plant in a pot for us.  The plant blossomed and we lost it over Winter Break.  (We are in Florida and I'm not sure our weather is quite right to start a viable pumpkin during October.). In the bottom picture, we left a lot of seeds and we received quite a large pumpkin patch.  You will see from the photograph on the bottom that we even got the start of pumpkins.  Once again we left for Winter Break and the patch died.  I'm content with taking a pumpkin and sticking it outside to see what happens.  Having a donated pumpkin is even better.  If you want to actually take care of the pumpkin and grow new pumpkins, you might want to research the best times to plant pumpkins and estimate the amount of time it will take your pumpkin to decompose.  Please leave any questions that you may have in the comment section.  There's also a link to a free pumpkin craft that I use to with this lesson at the bottom of the post.


SaveSave

Crayons In The Classroom


Crayons are such a HUGE part of the classroom.  Every teacher knows the trials and tribulations of having, needing and using them.  Below you will find some tips that may be new to you, an incredible giveaway and a freebie just for being you!


Tip #1 Engagement
Up the engagement in your next lesson by stocking a center with fun twistable crayons.  
These crayons have lasted my class three years so they were worth the expense! You know how excited you get when you have cool supplies to use so just think of how excited your students will be.


Tip #2 Rewards
Offer special crayons like these Silly Scents as a special reward for well behaved students or as a prize in your class store.  They last forever! I like to stock up after back to school time when everything is marked down.


Tip #3 Calm Down
If students need a repetitive task to calm down, have them sort your crayons.  It's an added bonus that you have color sorted crayons afterwards! You can even throw them in cute drawers or containers.

Tip #4  Build Independence
Set your classroom up so that students can get what they need and put away extra items that they find in the classroom.  We have a crayon bucket that we place all lost crayons in. When students need a certain color they can just go get what they need.  If they can get their own supplies, then you have more energy to do other things.

Here's a freebie for you!  Just click below on the Sweden photo.  Before you finish up, one last tip.

Tip #5 Fine Motor Skills
You can use this freebie to help build student's fine motor skills.  I love to put these sheets out for bell work.  They can have fun coloring, build fine motor skills and your administration won't freak out when they see the kids coloring.  We use this Sweden unit when we're learning about cultures from around the world.


a Rafflecopter giveaway
I am joining some of my friends with a STOCK YOUR CLASSROOM Giveaway.
  • Visit each blog and enter each rafflecopter.
  • A different winner will be chosen from each rafflecopter.
  • Enter between October 1 - 5, 2017.
  • Each of my friends will choose a winner.
  • Winners will be emailed.
  • Winners will also be announced on our FB pages or Instagram pages.  Make sure you follow our pages to see if you won.

PLEASE NOTE: Winners will have 48 hours to respond to our email.  If no response, we will choose a new winner.

You can win the prizes below by clicking on the following: